
Spark Plug Replacement
With all the new emission control and fuel injection systems taking up space, combined with the overall reduction in the size of engine compartments, the job of replacing your own spark plugs is now a royal pain in the butt as compared to vehicles produced even 10 years ago. However, with the newer solid state ignition systems, there is no longer a need to check the engine's timing during a tune-up. Tune-ups, back in the day, included a number of tasks, but now only include the changing of the spark plugs, yup, that is essentially the whole job. Heck, they don't even hook it up to the computer to see if there is any issues with the vehicle's computer. The tune-up is now a simple job that just about anyone can do as long as you can reach the plugs.
So, lets see if we can save some money...
Too Big of a Job?
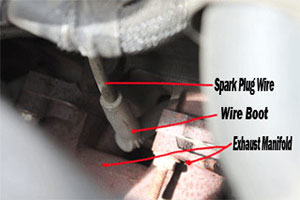
Before you make the decision to do it yourself, open up the hood of your vehicle and do some evaluation. Ask yourself some questions. Can you reach all the plugs? After making sure the engine is cool to the touch, physically run your hand down to the spark plug wire's boot and ensure you can grab a hold of it. Being able to do so will be, a good indication that you can get the proper tools down there to actually replace the plug. Keep in mind, a few models of cars require some engine compartment components to be removed in order to reach some of the plugs, and depending on your level of skill and time you want to invest, you may decide the professional mechanic is the right way to go.
Tools
Making sure you have the right tools is essential. You may figure out you need more, but here is a list of the basics:
- Rachet
- A half inch rachet would be ideal, but depending on the space you have, other sizes may do just fine.
- Spark Plug Socket
- Spark plugs come in many sizes and so do sockets - I suggest that you bring your spark plug sockets with you to the parts store when you get your replacement plugs and make sure you have the right tool before you leave. The socket should fit snuggly around the plug's nut.
- Socket Extension
- More than likely, you will need a socket, 3-6 inch long, extension to be able to reach the spark plug depending on its location and the depth it sits in the engine's head and manifold. Don't be surprised if you may need a universal joint for that one plug all the way in the rear of the compartment, and was torqued at the factory to 5 times the spec... there is always one!
- Spark Plug Gapping Tool
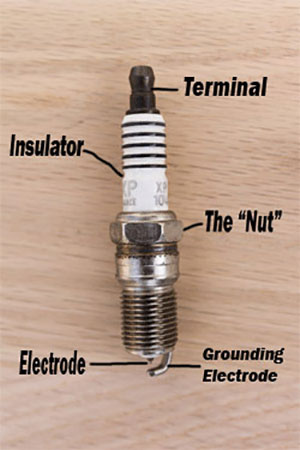
- The gap tool is for ensuring the gap between the ground electrode and the electrode are at the right distance apart for optimal engine firing. The vehicle's manufacturer will provide the gap best for your model. If you don't know where to get the gap, ask the parts store guy - he should be able to pull it up for you.
- Silicone Dielectric Grease
- Its a compound you can get at any auto parts store. You put a little in the spark plug wire boot before replacing the boot back on the distributor and plug. It ensures a good connection and fights against corrosion.
- Gloves
- Mainly to protect yourself from smashing your knuckles or tearing skin off your hand when you attempt to pull off the boot and when you break the seal extracting the spark plug - don't say I didn't warn ya!
Replacing the Plugs and Wires
I highly recommend that you only replace one plug at a time. That way you don't get your spark plug wires crossed! Also, I recommend that while you are under the hood, and up close and personal with your spark plugs, replace the spark plug wires, too. If you choose not to replace the wires, just ignore the direction on how to do so. Your call.
OK, lets get started. I say again, make sure the engine is cool. Working on a hot engine can burn your skin. Also, if your engine heads are aluminum, removing the spark plugs while the engine is hot can cause a slight warping of the head; not a good thing.
With a glove on your hand, grab as much of the spark plug wire's boot as you can. Twist the boot and pull it off the plug. Make sure you try and pull it straight off because sometimes with older wires, the connector inside the boot will break off and remain on the spark plug's terminal.
If you were not planning on changing the wires and that happens... your plans changed.
With whatever socket, extension combination works best, place the socket over the spark plug until it is secure and then turn the rachet until it breaks the seal that was created when the plug was torqued down. You should be able to easily remove the plug.
Take a new plug out of its package, and use your spark plug gapping tool to ensure a proper gap. Once the gap is set, use your hand to put the plug back in its whole and screw it in, all the time making sure you don't cross thread it. Now that you have it started, you can use the socket to finish it up and tighten the spark plug down. You do not need to apply a ton of pressure; there is no extra points for trying to snap the plug in two!
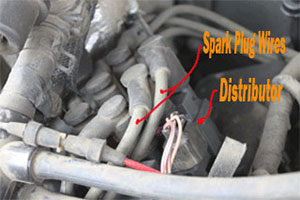
To replace the wire, make sure you follow it with your hand around to where it connects to the distributor - along the way you should encounter brackets that keep the wires organized; these brackets can easily be opened with a screw driver or a pair of needle nose pliers. doing so, allows you to remove the wire from its track. Remove the wire's distributor end boot from the distributor. Match up the old wire with a new wire that you purchased for this job. Make sure the new wire matches the length of the old one - each replacement wire is made to replace a certain wire!
Now, reroute the new wire back to where the old wire was - firmly replace the boot on the spark plug and the distributor. Repeat these steps until all your spark plugs are replaced.
Once you're finished, start up the vehicle and reward yourself with a night out using the money you saved!